

Introduction
Piping systems are failing at an alarming rate across the country as our infrastructure ages. From domestic supply pipes (hot and cold drinking water), to drain, waste and vent piping, to heating and cooling piping, its all starting to go. Because these pipes are usually out of sight behind sealed walls, communities often fail to realize how dangerous their situation may be. While condo boards typically budget for maintenance projects that are routine and visible (landscaping, resurfacing parking lots, etc.), they rarely budget for the things “inside the walls” resulting in a surprise expense when it becomes necessary to repipe the building. However, with proper planning, problems can be identified, financing can be secured, and the situation can be rectified with minimal disruption to the lives of the residents. The following critical success factors can help guide your board through the planning stages of a repipe to ensure the best possible outcome for your project.
Read Below, or Download the PDF version.
Step #1: Identify Your Condo’s Pipe Problems
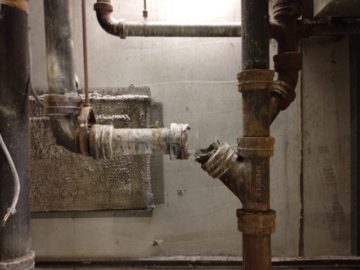
With pipes being hidden, property managers, maintenance staff and even residents need to keep their eyes (and ears and noses) looking out for signs of a potential problem. Symptoms leading to a repipe can include: back-ups, slow drains, leaks, odors, noise coming from the pipes, mold and water damage, off tasting water, discolored water, inefficient heating and cooling, and more. Surveying and listening to residents about their concerns and observations is a great way to gauge how significant the problem may or may not be, and whether further investigation is warranted.
Step #2: Assemble Your Board and Secure The Facts
Following a simple process when you identify the problem can help calm any fears and bring a sense of order to the opinions and decision-making process. First, discuss the situation with the board, evaluate how significant the problem may be, and determine if further research and data gathering is required. If so, we recommend hiring a professional to visit your property to provide an “order of magnitude” as to how pervasive the problem may be. Is it only one riser that’s causing the leaks, or is the problem property wide? Once you know what, and how big, the problem is, the board can more easily decide how to proceed.
Step #3: Develop a Clear Scope of Work
Once you know what repairs are required, you need to formally scope the project. This can be done directly with a repipe contractor or, if preferred, through a third party such as an engineer or a construction manager. Once formally scoped, you can solicit bids, compare contractors, and begin your renovations. Board alignment and approval at this stage is paramount. By developing a clear scope of work at the outset, you can minimize politics by gaining alignment before the project starts. This may require a new set of plans to obtain permits, which typically requires hiring an architect or mechanical engineer. A clear scope of work also helps reduce change orders and minimizedisruption. It defines what will be replaced, including start and end points, and clarifies the required code upgrades, such as suds relief or low-flow toilets. In addition, this process helps determine if there are hazardous material (HAZMAT) considerations such as asbestos or lead paint that require remediation in your community.
Step #4: Determine the Financial Implications
The next step is to determine how the project will be paid for and to communicate this to your owners well in advance of beginning the work. Most likely, your repipe will cost more than you have set aside in your reserves. Thus, communities regularly seek loans to cover the costs (often temporarily raising condo fees to pay them back) or occasionally issuing special assessments to owners to help cover the costs. A variety of financing options are available, but make sure your loan amount covers the project, engineering, code upgrades, and a contingency budget for unknowns. In addition, when calculating total costs, consider all angles, such as exploring avenues for other cost reductions as a result of the repiping (e.g., insurance rates frequently go down after a repipe).
Step #5: Set Expectations with Owners and Residents
Communications and owner engagement throughout the repipe process are critical for a project of this size and scope to be successful. This will undoubtedly be the most intrusive, inconvenient project your community has ever undertaken. As such, communications and setting expectations are the most important part, as residents don’t always pay attention. Invariably, an owner will wake up one day to find their water has been shut-off and will start calling maintenance staff and board members when they don’t know what is going on. Communicating early and often helps minimize these incidents. While water shutdowns are a necessity, they can be minimized with the installation of isolation valves so you don’t have to shut down the whole building every day. This is an important consideration when scoping the project with your contractor. Likewise, communicating what will (and won’t) be completed each day can help minimize frustration. When an owner comes home from work and is unhappy with the state of their unit, they need to understand where they are in the process. There is no need to sound alarm bells about paint not matching if the punch list has not yet been completed. Chances are your contractor is aware of what still needs to be done, and prematurely raising flags only causes increased tension and delays. And despite all precautions and best-in-class containment methodologies, there will be some dust. It’s unavoidable. Level setting these expectations up front will go a long way towards easing the process for nervous residents.
Step #6: Outline Your Priorities
The board will ultimately need to decide where it will (and won’t) spend money. The two primary cost drivers are 1) the amount of plumbing and 2) how you gain access to the pipes. The amount of plumbing is determined largely by the building configuration. Do all the floors have the same layout and stack vertically, or are there different unit layouts on each floor? Are all the units the same, or do some have more, or fewer, bathrooms? How large are the common areas, and how much plumbing do they contain? Do these all need to be repiped as well? Are isolation valves already present and are they operational or do new valves need to be installed? Access to the piping is another key consideration. Are the pipes accessible through a hallway or a closet or will the repipe require removal and resetting of kitchens and/or bathrooms? In the common areas, are the pipes exposed in the garage or is there first floor commercial space (stores, restaurants, etc.) that must be taken into consideration? Are there multiple layers of drywall, fire rated drywall assemblies, plaster or wood finishes? Ultimately, the board must determine what will define success: Is the goal to return the property to its original construction (the less expensive solution) or to accommodate custom homeowner improvements (such as homeowner installed wallpaper and tile work), which are more expensive?
Step #7: Understand and Communicate Liability
Your board will need to discuss its bylaws with an attorney to review, very carefully, what the association versus the homeowner is accountable for and where it wants to draw those lines. Which walls and pipes are common community property and which, if any, are considered homeowner responsibility. What happens when residents refuse to pay? What recourse does the association have? How do you avoid lawsuits?
Step #8: Pick the Right Contractor for Your Project
Once you have sorted all the details, choosing the right contractor is essential to ensuring a quality repipe that is delivered on time and in budget. Look at their experience working in occupied condominiums, pricing models, proposed staffing, use of subcontractors, bonding, proposed schedule, insurance, and propensity for change orders. Always check references and ask to tour a current project to better understand the realities of a repipe. In the end, a condominium repipe project does not have to be a nightmare. When planned in advance, and communicated properly, most if not all of the inconveniences and concerns can be addressed and the project can be a success, resulting in increased property values, reduced insurance rates, and years of maintenance free plumbing.
About the Author: Eric Lecky is the Chief Marketing Officer at SageWater, North America’s leading pipe replacement contractor. SageWater operates nationwide and has replaced more than 35 million feet of pipe in over 100,000 occupied units in residential and commercial properties.